Intro#
Building an agent on your laptop is the easy part. Getting that same agent to run securely for thousands of users, with its own identity, persistent state, and proper observability? That is where most projects hit a wall. I have spent a lot of time lately building agents, and the pattern is always the same: the intelligence is done in an afternoon, and then the “make it production-ready” work eats the next two weeks.
Hosted agents in Microsoft Foundry Agent Service are Microsoft’s answer to exactly that gap. In this post I want to walk through what hosted agents are, why I think they are a big deal, and then get hands-on with three real examples, from your first hosted agent to bringing your own framework. Let’s dig in.
Overview#
A hosted agent is a containerized agentic application that Foundry runs and manages for you. You write the agent logic (in Python or C#), pick whatever framework you like, and deploy it. Foundry provisions the compute, gives the agent a dedicated identity, exposes a stable endpoint, and handles scaling, state, and tracing. You bring the code, the platform handles the plumbing.
The important word here is “your code”. Unlike prompt-based agents that you define entirely through prompts and tool configuration in the portal, a hosted agent is your own application. You choose the framework (Microsoft Agent Framework, LangGraph, Semantic Kernel, or plain custom code), you control the runtime behavior, and you deploy a container image (or, more recently, just your source code) to Microsoft-managed infrastructure.
Microsoft announced the public preview refresh of hosted agents earlier this year and followed up with a batch of updates around Microsoft Build. The feature moved quickly, and hosted agents reached general availability at the beginning of July 2026. Several of the newer capabilities on top (like source-code deployment and the agent optimizer) are still in public preview, which I will flag as we go.
Why not just use a container app or a function?#
This was my first question too. Traditional compute (web apps, containers, serverless functions) was built for web services where many users share the same instance. That is perfectly fine for a REST API. It is a problem for agents.
Think about what an agent harness actually does: it reads and writes files, it executes arbitrary code, it holds sensitive context and credentials. Now imagine Customer A and Customer B both hitting the same shared container. Suddenly one session can see another session’s files and state. That is not just inefficient, it is a security and isolation nightmare.
Hosted agents solve this with per-session, VM-isolated sandboxes. Every single agent session gets its own hypervisor-isolated sandbox with a persistent filesystem. Here is how the two approaches compare:
| Traditional compute | Hosted agents | |
|---|---|---|
| Isolation | Many sessions share a container | Every session gets a dedicated sandbox |
| Cold starts | Seconds to minutes, high variance | Seconds, low variance, predictable |
| Idle cost | Always-on billing or slow scale-from-zero | Scale to zero with filesystem-preserving resume |
| State | You build it (databases, external storage) | Built in, files and disk survive scale-to-zero |
| Identity | Shared service account | Per-agent Microsoft Entra ID (agent identity) |
| Observability | You build it | Built in (agent, session, fleet) |
How it works#
You package your agent as a container image and push it to Azure Container Registry (or deploy straight from source, more on that later). When you deploy, Agent Service pulls the image, provisions compute, assigns a dedicated Microsoft Entra ID, and exposes a dedicated endpoint. At runtime your code handles requests and can call Foundry models, Toolbox tools, and downstream Azure services using its agent identity.
(managed on code, your ACR on container)"] Reg -->|image pull| Host["Foundry hosted runtime"] Host -->|Responses / Invocations| Client["Portal / SDK / Teams"] Host -->|agent identity| Model["Foundry model"] Host -->|agent identity| Tools["Toolbox / Azure services"]
Real-world examples#
This clicks faster with concrete scenarios. A few that map neatly onto hosted agents:
- A coding agent that refactors a repo overnight. It clones the code into its sandbox, writes and executes code, and needs that working directory to survive across a long-running task. Per-session filesystem persistence is exactly what it wants.
- A customer support agent published to Teams. It answers thousands of conversations in parallel, each one isolated, each one carrying the user’s identity through On-Behalf-Of so it only sees what that user is allowed to see.
- A research agent that synthesizes hundreds of documents into a briefing. It downloads files into
$HOME, processes them, and can scale to zero between runs so you pay nothing while it waits for the next request. - A webhook receiver for GitHub, Stripe, or Jira. These systems send their own payload format, so the agent uses the Invocations protocol to accept arbitrary JSON rather than an OpenAI-style chat message.
Key concepts to know#
Before we write code, a few concepts that shape how you build:
- Sessions and conversations. A session is a logical unit with persisted state (
$HOMEplus files uploaded via the/filesendpoint). A conversation is a durable record of the message history stored in Foundry. With the Responses protocol the platform manages conversation history for you; with Invocations you manage session state in your own code. - Session lifecycle. Compute is created on first use. After 15 minutes of inactivity the platform deprovisions the compute and persists the session state, then restores it automatically when the session resumes. A session is permanently deleted after 30 days of inactivity. This is where scale-to-zero comes from.
- Two identities. Each agent gets its own Microsoft Entra ID (agent identity) for runtime calls (models, tools, downstream services). Separately, the project managed identity is used by the platform for infrastructure operations like pulling the container image. You do not wire these up manually.
- Protocols. Hosted agents can speak Responses (OpenAI-compatible, platform-managed history and streaming), Invocations (arbitrary JSON in and out, you own the schema), and Invocations (WebSocket) for real-time voice. A single agent can expose more than one. Not sure which to pick? Start with Responses, you can add Invocations later.
- Sandbox sizes. You choose the CPU and memory per session: 0.5 vCPU / 1 GiB, 1 vCPU / 2 GiB, or 2 vCPU / 4 GiB. Billing is based on CPU and memory consumed across active sessions, so oversizing multiplies cost by your concurrency.
- Scaling. Hosted agents scale per session, not per replica: the platform spins up one isolated sandbox per session on demand and tears it down when the session ends. There’s no replica count or warm pool to size, and no fixed ceiling you configure, so capacity just follows your concurrent-session count and drops to zero when everything is idle.
Requirements#
Here is everything you need to follow along. The flow leans on the Azure Developer CLI (azd), which scaffolds the project and provisions the Azure side for you, so the list is shorter than it used to be.
Local tooling#
- An Azure subscription with access to Microsoft Foundry.
- Python 3.13+ (the
azd ai agent runtooling and the supported hosting runtimes require 3.13 or newer). - The Azure CLI and the Azure Developer CLI (azd) 1.25.3+.
- The Foundry extension for azd, which adds the
azd ai agent ...commands:azd ext install microsoft.foundry. Confirm it withazd ext list.
NOTE: Docker Desktop is not required. The image is always built remotely, so you don’t need a local Docker install for either deploy mode. The only difference is whether you author a Dockerfile: the default code mode builds the image from your source and declared runtime for you, while container mode uses your own Dockerfile for full control over the build.
Azure resources#
Under the hood a hosted agent needs a Foundry resource and project in a region that supports hosted agents and a model deployment (the wizard defaults to gpt-5.4-mini). In the default code + remote build mode that is essentially all that lands in your resource group. There is no container registry (the platform builds your image from the uploaded source and stores it on Microsoft-managed infrastructure); an Azure Container Registry only enters the picture on the container path, where you supply your own Dockerfile. Neither scaffold provisions Application Insights, so tracing is a quick opt-in: hit Connect in the portal’s Traces tab (or add it to the infra and re-provision) and traces start flowing. azd provision stands the rest up for you, no resources to create by hand.
TIP: Prefer to own the infrastructure yourself (fixed names, an existing project, Bicep in source control)? You can provision separately and point azd at the existing project. My Foundry advanced workshop does exactly that with a main.bicep if you want that level of control.
Permissions#
Because azd provision creates the platform role assignments for you, there is just one you add by hand (your own). It still helps to picture the principals involved, three identities, each needing a role at a specific scope:
user] -->|Owner at RG for a new project
or Foundry Project Manager for an existing one| Proj[Foundry project] You -.->|Foundry User
add by hand, needed for azd ai agent run and azd deploy| Acct[Foundry resource] ProjMI[Project managed identity] -->|Container Registry Repository Reader
container mode only| ACR[(Container registry)] ProjMI -->|Foundry User| Acct Agent[Agent identity
created at first deploy] -->|Foundry User| Acct
What you actually need on your own account depends on whether azd creates a new project or reuses an existing one, straight from the official permissions reference:
- Creating a new Foundry project: Owner at the resource group scope, so provision can create the resources and assign the roles below.
- Using an existing project: Foundry Project Manager at the project scope.
Most of it is automatic. The project managed identity gets Foundry User on the Foundry resource (to run model inference), plus Container Registry Repository Reader on a registry when one is involved (the container path only), and each agent identity gets Foundry User when the platform creates it on the first deploy. The one assignment you do have to add by hand is Foundry User for your own identity: your CLI needs it for both azd ai agent run and azd deploy, since each acts as you against the project’s data plane. I cover it in Lesson 01.
Sign in#
Authenticate once for both CLIs, az for your local credentials and azd for provisioning and deployment:
az login
azd auth login
TIP: run azd config set auth.useAzCliAuth true once and azd reuses your az credential, so a single az login covers both.
You don’t need to hand-build a virtual environment or a .env for the azd flow; azd ai agent run handles the venv, dependencies, and environment values for you. (Running python main.py directly still reads a local .env.)
Coding#
Let’s build from the ground up. I will use Microsoft Agent Framework for the first two examples, then show how the exact same platform hosts a completely different framework in the third.
Lesson 01: your first hosted agent#
The smallest possible hosted agent is genuinely small. You create a FoundryChatClient, wrap an Agent in a ResponsesHostServer, and call run():
import os

from azure.identity import DefaultAzureCredential
from dotenv import load_dotenv

from agent_framework import Agent
from agent_framework.foundry import FoundryChatClient
from agent_framework_foundry_hosting import ResponsesHostServer

load_dotenv()

credential = DefaultAzureCredential()

# --- Foundry client for the agent to use ---
client = FoundryChatClient(
    project_endpoint=os.environ["FOUNDRY_PROJECT_ENDPOINT"],
    model=os.environ["AZURE_AI_MODEL_DEPLOYMENT_NAME"],
    credential=credential,
)

# --- Agent definition and instructions ---
agent = Agent(
    client=client,
    instructions=(
        "You are a helpful healthcare assistant. "
        "You answer questions about general health, wellness, and medical terminology. "
        "Always remind the user that your answers are for informational purposes only "
        "and not a substitute for professional medical advice."
    ),
    default_options={"store": False},
)

# --- Start the server to host the agent ---
server = ResponsesHostServer(agent)
server.run()
The nice detail here is DefaultAzureCredential. Locally it uses your az login session. Once deployed, Foundry injects a managed identity automatically, so the exact same code authenticates in the cloud with no changes.
Alongside main.py the only other file you bring is a requirements.txt with your dependencies. For this Agent Framework agent that is just the Foundry client and hosting packages (plus debugpy, so the Foundry Toolkit can attach a local debugger):
agent-framework-foundry
agent-framework-foundry-hosting>=1.0.0a260630

# debugpy enables local debugging of this agent with the Foundry Toolkit VS Code extension.
debugpy
azure-identity and python-dotenv, which main.py imports, come in transitively with agent-framework-foundry, so you don’t have to list them yourself.
There’s no hosting manifest to hand-write. When you run azd ai agent init (next step), the wizard generates an azure.yaml that declares your agent as a service, with the protocol and the model deployment name (AZURE_AI_MODEL_DEPLOYMENT_NAME) in that azure.ai.agent entry. The project endpoint needs no mapping: azd provision publishes it as FOUNDRY_PROJECT_ENDPOINT and the platform injects it at runtime.
NOTE: those variable names are a convention, not something the tooling scrapes from your code. The sample’s .env.example spells out the contract; azd provision fills both in (writing them into .azure/<env>/.env) and injects them at runtime, so the names your main.py reads must match:
FOUNDRY_PROJECT_ENDPOINT="..."
AZURE_AI_MODEL_DEPLOYMENT_NAME="..."
That is essentially the whole agent, no Dockerfile needed in the default code mode. (Prefer to own the build? Use --deploy-mode container with your own Dockerfile on port 8088.)
With the tooling from the Requirements section in place, the loop is short. Put your main.py and requirements.txt in a folder, then walk it one step at a time.
1. Initialize the project:
azd ai agent init --deploy-mode code
Because the folder already contains your code, azd ai agent init offers Use the code in the current directory. Say yes, then answer the wizard: a project and agent name, the runtime (Python 3.13), the entry point (main.py), how dependencies are resolved (Remote build), the protocol (responses), whether to Create a new Foundry project or reuse an existing one, then your subscription, region, and model (deploy a new one from the catalog, the wizard suggests gpt-5.4-mini). When it finishes you have an azure.yaml with your agent wired up and an environment seeded under .azure/<env>/, no files to copy, no manifest to hand-write.
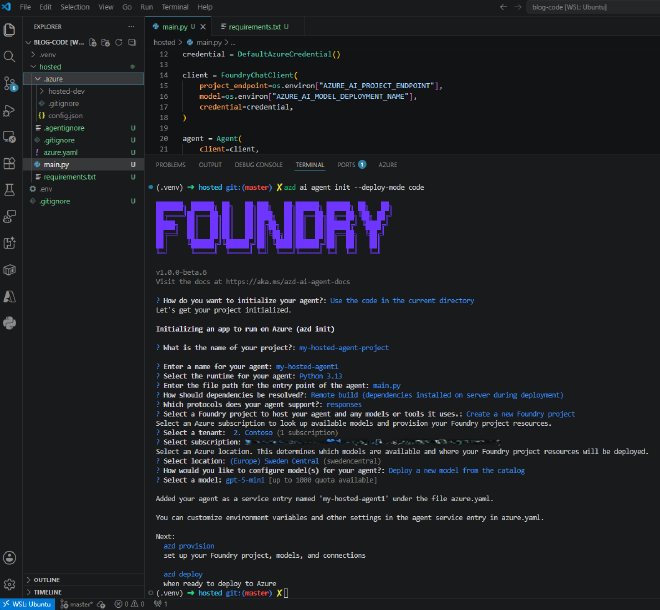
TIP: prefer a running starting point over your own blank main.py? Initialize in an empty folder instead and the wizard downloads the ready-made Basic Agent Framework sample (into a src/ subfolder), then replace its main.py with your own.
2. Provision the Azure resources:
azd provision
This is the step that does the heavy lifting: it reads azure.yaml, stands up the Azure resources (on the code path that is the Foundry project and model deployment), and writes their values (endpoint, model, project ID) straight into the azd environment. No manual variable juggling, and the platform’s role assignments are created for you. That leaves just one role for you to add by hand, and the flow is still far shorter than wiring everything up yourself.
NOTE: that role is for your own identity. Your CLI performs data-plane actions against the project: azd ai agent run executes main.py locally and calls the model through the project endpoint, and azd deploy creates the agent version (an agents/write action). Both run as you, not a managed identity. Owner and Contributor are control-plane roles and don’t cover these, so you can hit a 403, either “You don’t have permission to build agents in this project” on a local run or “does not have permissions for …agents/write” on deploy. The fix is the least-privilege data-plane role, Foundry User. The Foundry portal even offers an Assign me the Foundry User role button. From the CLI, assign it at the Foundry resource scope after azd provision:
# Your signed-in user's object ID
az ad signed-in-user show --query id -o tsv

# Grant the Foundry User data-plane role at the Foundry resource (account) scope.
az role assignment create \
  --assignee <your-object-id> \
  --role "Foundry User" \
  --scope /subscriptions/<subscription-id>/resourceGroups/<resource-group>/providers/Microsoft.CognitiveServices/accounts/<foundry-account>
Give it a minute or two to propagate, then re-run the command. This applies to both the code and container modes (I hit the deploy 403 on the container path). What the managed identity covers is the deployed agent at runtime, calling models from inside its own project, not your CLI commands. For the full role matrix, see the hosted agent permissions reference.
3. Run the agent locally:
azd ai agent run
This builds a virtual environment, installs the dependencies, and starts the agent, but it doesn’t stop there. It also pops open a browser with the Agent Inspector, a chat UI wired straight to your local http://localhost:8088 endpoint. You can send prompts and watch the raw Responses API events stream in on the side (response.output_text.delta, response.completed, and friends), which makes it easy to see exactly what the agent is emitting. Great for a quick sanity check before you deploy.
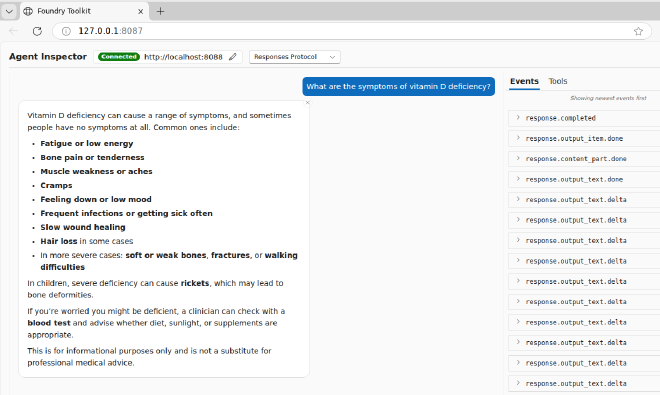
TIP: azd ai agent invoke --local "..." hits that same local endpoint from a second terminal, so you can script quick checks while the Inspector is open.
4. Deploy to Foundry:
azd deploy
The platform builds the container image remotely from your source and declared runtime and ships it to Foundry as a hosted agent, storing it on managed infrastructure (on the code path there’s no registry in your resource group). No local Docker, no image to babysit.
5. Invoke the deployed agent:
azd ai agent invoke "What are the symptoms of vitamin D deficiency?"
This calls the deployed endpoint (now running under the project managed identity) and streams the response back to your terminal. That is the full loop, from your own main.py to a running hosted agent in Foundry.
Lesson 02: tools and file persistence#
An agent that only chats is not that interesting. The feature I really wanted to try here is per-session file persistence: each session gets a VM-isolated sandbox with a persistent filesystem, so anything the agent writes to disk survives idle periods and is restored when the session resumes. No database, no blob storage, no wiring. To reach that filesystem the agent needs tools, and with Agent Framework a tool is just a plain Python function you decorate with @tool.
Let’s give the agent two tools that read and write notes on the sandbox. The docs list $HOME (and /files) as the persistent locations, so I write under $HOME/notes. Drop these two functions into your main.py from Lesson 01, above the agent definition:
# --- New imports ---
from datetime import datetime
from typing import Annotated

from agent_framework import tool
from pydantic import Field

NOTES_DIR = os.path.join(os.path.expanduser("~"), "notes")  # persistent per-session $HOME

# --- Tools for the agent to use ---
@tool(approval_mode="never_require")
def save_session_note(
    note: Annotated[str, Field(description="The note text to save")],
) -> str:
    """Save a note to the per-session sandbox filesystem."""
    os.makedirs(NOTES_DIR, exist_ok=True)
    timestamp = datetime.now().strftime("%Y%m%d_%H%M%S")
    filepath = os.path.join(NOTES_DIR, f"note_{timestamp}.txt")
    with open(filepath, "w") as f:
        f.write(note)
    return f"Note saved to {filepath}"


@tool(approval_mode="never_require")
def list_session_notes() -> str:
    """List all notes saved in the current session."""
    if not os.path.exists(NOTES_DIR):
        return "No notes found."
    files = sorted(os.listdir(NOTES_DIR))
    if not files:
        return "No notes found."
    results = []
    for fname in files:
        with open(os.path.join(NOTES_DIR, fname)) as f:
            results.append(f"--- {fname} ---\n{f.read()}")
    return "\n\n".join(results)
Then hand both tools to the agent. This replaces the Agent(...) block from Lesson 01, everything else (the FoundryChatClient and the ResponsesHostServer(agent).run() at the bottom) stays exactly the same:
# --- Agent definition with tools and instructions ---
agent = Agent(
    client=client,
    instructions=(
        "You are a helpful healthcare assistant with access to health tools. "
        "Use save_session_note and list_session_notes to manage the user's notes. "
        "Always remind the user that your answers are for informational purposes only "
        "and not a substitute for professional medical advice."
    ),
    tools=[save_session_note, list_session_notes],
    default_options={"store": False},
)
NOTE: the $HOME sandbox only exists on the hosted platform. Running these tools under azd ai agent run writes to your laptop’s home directory, which tells you nothing about session persistence, so test this one after azd deploy.
Deploy, then save a note and list it back in two separate calls:
azd ai agent invoke "Save a note: Patient P-1001 follow-up scheduled for December."
azd ai agent invoke "List my session notes"
The note is still there on the second call, even though the compute scaled down in between and the session resumed a fresh sandbox. You did not provision a database or wire up storage; the platform did the boring-but-critical work for you.
TIP: consecutive invokes reuse the last session automatically, so the two calls above land in the same sandbox. Pass --new-session to start fresh, or pin a specific session with --session-id <id> (the ID is printed on every invoke). Make sure you are on a recent azure.ai.agents extension; on an older beta the auto-reuse misfired for me and every invoke got a new empty session.
Lesson 03: bring your own framework (LangGraph)#
Here is the part I find genuinely powerful. Foundry does not care which framework you use. It only needs your agent to speak the Responses protocol on port 8088. So you can take a completely different stack, in this case LangGraph, and host it on the exact same platform: same azd flow, same per-session sandbox, same managed identity.
This used to require a hand-written adapter to translate Responses requests into LangChain messages and back. That is no longer necessary. Microsoft now ships a supported hosting package, langchain-azure-ai[hosting], whose ResponsesHostServer takes a compiled LangGraph graph and handles all the protocol plumbing for you. You build the graph, it does the rest.
Here is the whole agent: the same healthcare assistant, this time with two new tools (patient lookup and BMI), built with LangChain’s @tool, a LangGraph StateGraph, and the official host. This is a fresh project, so it is a complete main.py, not a diff:
# --- Lesson 03 — LangGraph hosted agent (bring your own framework) ---

import json
import os
from typing import Annotated, Any

from azure.identity import DefaultAzureCredential
from dotenv import load_dotenv
from langchain_azure_ai.agents.hosting import ResponsesHostServer
from langchain_azure_ai.chat_models import AzureAIOpenAIApiChatModel
from langchain_core.messages import AIMessage, SystemMessage
from langchain_core.tools import tool
from langgraph.graph import END, START, StateGraph
from langgraph.graph.message import add_messages
from langgraph.prebuilt import ToolNode
from pydantic import Field
from typing_extensions import TypedDict

load_dotenv()

credential = DefaultAzureCredential()


# --- Tools ---
@tool
def lookup_patient_record(
    patient_id: Annotated[str, Field(description="Patient ID, e.g. P-1001")],
) -> str:
    """Look up a patient record by ID."""
    records = {
        "P-1001": {"name": "Alice Johnson", "age": 34, "blood_type": "A+",
                   "conditions": ["asthma"]},
        "P-1002": {"name": "Bob Martinez", "age": 58, "blood_type": "O-",
                   "conditions": ["type 2 diabetes", "hypertension"]},
    }
    record = records.get(patient_id)
    if record is None:
        return f"No patient found with ID {patient_id}."
    return json.dumps(record, indent=2)


@tool
def calculate_bmi(
    weight_kg: Annotated[float, Field(description="Weight in kilograms")],
    height_m: Annotated[float, Field(description="Height in meters")],
) -> str:
    """Calculate Body Mass Index (BMI) from weight and height."""
    if height_m <= 0:
        return "Height must be greater than zero."
    bmi = weight_kg / (height_m ** 2)
    category = (
        "underweight" if bmi < 18.5
        else "normal weight" if bmi < 25
        else "overweight" if bmi < 30
        else "obese"
    )
    return f"BMI: {bmi:.1f} ({category})"


tools = [lookup_patient_record, calculate_bmi]


# --- Model (Foundry deployment via langchain-azure-ai) ---
llm = AzureAIOpenAIApiChatModel(
    project_endpoint=os.environ["FOUNDRY_PROJECT_ENDPOINT"],
    model=os.environ["AZURE_AI_MODEL_DEPLOYMENT_NAME"],
    credential=credential,
).bind_tools(tools)


# --- LangGraph graph ---
SYSTEM_PROMPT = (
    "You are a helpful healthcare assistant. "
    "You can look up patient records and calculate BMI. "
    "Always remind the user your answers are for informational purposes only."
)


class AgentState(TypedDict):
    messages: Annotated[list, add_messages]


def chatbot(state: AgentState) -> dict[str, Any]:
    messages = [SystemMessage(content=SYSTEM_PROMPT)] + state["messages"]
    return {"messages": [llm.invoke(messages)]}


def should_continue(state: AgentState) -> str:
    last_message = state["messages"][-1]
    if isinstance(last_message, AIMessage) and last_message.tool_calls:
        return "tools"
    return END


graph_builder = StateGraph(AgentState)
graph_builder.add_node("chatbot", chatbot)
graph_builder.add_node("tools", ToolNode(tools))
graph_builder.add_edge(START, "chatbot")
graph_builder.add_conditional_edges("chatbot", should_continue, {"tools": "tools", END: END})
graph_builder.add_edge("tools", "chatbot")

graph = graph_builder.compile()


# --- Serve on the Foundry Responses protocol ---
if __name__ == "__main__":
    port = int(os.environ.get("PORT", "8088"))
    ResponsesHostServer(graph).run(port=port)
A few things worth pointing out:
- The tools use LangChain’s
@tooldecorator (note there is noapproval_modehere, that is an Agent Framework detail). AzureAIOpenAIApiChatModelconnects to your Foundry model deployment, and.bind_tools(tools)tells the model what it can call. It reads the sameFOUNDRY_PROJECT_ENDPOINTandAZURE_AI_MODEL_DEPLOYMENT_NAMEvalues as Lesson 01.- The
StateGraphis the part you own: achatbotnode calls the model, atoolsnode runs any tool calls, andshould_continueloops back until the model is done. That explicit loop is exactly what Agent Framework handles internally for you, here you get to see and shape it. ResponsesHostServer(graph).run(port=port)is the entire hosting layer. Because a normal LangGraph graph already keeps its state in amessagesfield, the host wires straight into it, no translation code.
The requirements.txt pulls the hosting package and LangGraph:
langchain-azure-ai[hosting]>=1.2.4
langgraph
langchain-core
azure-identity
python-dotenv
From here the flow is identical to Lesson 01. Point azd ai agent init at this folder, reuse your existing Foundry project and model deployment from the previous lessons, then provision and deploy:
azd ai agent init --deploy-mode code
azd provision
azd deploy
Then invoke it with a prompt that needs both tools in a single turn:
azd ai agent invoke "Look up patient P-1002 and calculate BMI for 95kg at 1.80m"
The agent comes back with Bob Martinez’s record and a BMI of 29.3 (overweight), the LangGraph loop deciding on its own to call both tools before answering. Same platform, same commands, a completely different framework under the hood.
The azure.yaml service entry is identical to the previous lessons (and if you use container mode, so is the Dockerfile). That is the whole point: no lock-in. Foundry is multi-model and multi-harness by design, so you can run models from OpenAI, Anthropic, Meta, Mistral and others, and bring LangGraph, Agent Framework, the OpenAI Agents SDK, or your own custom loop.
What’s new since the preview#
Because this space moves fast, it is worth calling out the updates Microsoft shipped after the initial refresh. A few stood out to me:
Deploy straight from source code, no container required. This is the
codedeploy mode we used above: you point azd at a Python or .NET project and let the platform build the image, with noDockerfileto maintain. You can also scaffold it directly from existing source:azd ai agent init \ --src ./src/my-agent \ --agent-name my-unique-agent \ --deploy-mode code \ --runtime python_3_13 \ --entry-point main.py \ --dep-resolution remote_build azd deploySupported runtimes are
python_3_13,python_3_14, anddotnet_10. Container-based deployment is still fully supported when you want full control over the runtime. The hosted agent quickstart (azd) walks through the source-code flow end to end.Built-in content safety guardrails. Instead of standing up your own Content Safety endpoint and middleware, you can attach guardrail policies to the agent definition. Every prompt is checked before it reaches your code, and every response before it reaches the user.
Voice Live and WebSocket support. The Invocations (WebSocket) protocol adds a persistent bidirectional connection for real-time voice agents, pairing with frameworks like Voice Live, Pipecat, or LiveKit. It started out limited to North Central US, and per the docs the WebSocket protocol is now available across all regions that support hosted agents.
Agent optimizer. A closed-loop engine that evaluates your agent against defined criteria, generates better instructions (or skills, model choices, and tool descriptions), ranks the candidates, and lets you deploy the winner as a new version. It is now in public preview.
Closing#
What I like most about hosted agents is that they let me keep the fun part (writing the agent) and hand off the hard part (running it safely at scale). Per-session isolation, a persistent filesystem, a built-in identity, scale-to-zero economics, and observability out of the box are exactly the things I used to cobble together by hand. Add source-code deployment, guardrails, and the agent optimizer on top, and the path from “works on my machine” to “running in production” gets dramatically shorter.
If you want to get your hands dirty, the Microsoft Foundry Advanced Workshop walks through all of this end to end, from your first hosted agent to Toolbox, guardrails, and knowledge grounding. And since this space keeps evolving fast, keep an eye on the official docs for the latest. Happy building!
Sources#
- What are hosted agents? (Microsoft Learn)
- Introducing the new hosted agents in Foundry Agent Service (Microsoft Foundry Blog)
- What’s New in Hosted Agents in Foundry Agent Service (Microsoft Foundry Blog)
- Microsoft Foundry Advanced Workshop
- Microsoft Agent Framework documentation
- Host LangGraph agents as Foundry hosted agents
- What is Microsoft Foundry?
- Hosted agents region availability
- Install the Azure CLI
- Install the Azure Developer CLI (azd)
- Download Python
- Create an Azure free account